
Plastics can be shaped into useful products using several different molding techniques, each suited for specific applications. Understanding these processes provides context for why injection molding is such a dominant method in industry today.
🔹 Overview of Common Molding Techniques
- Extrusion Molding: Plastic pellets are melted and forced continuously through a die to create long, uniform shapes such as pipes, sheets, and films. The process is best for continuous profiles rather than discrete parts.
- Injection Molding: Involves melting polymer pellets and injecting them under high pressure into a closed mold. After cooling and solidifying, the mold opens to eject the final part. This method is ideal for complex geometries and high-volume production.
- Compression Molding: Thermoset resins or elastomers are placed into a heated mold cavity and compressed until they take shape. It is widely used in automotive and aerospace industries for large, strong parts.
- Thermoforming: A sheet of thermoplastic is heated until soft and then shaped over a mold using vacuum or pressure. This technique is common for packaging materials, disposable cups, and trays.
- Rotational Molding: Powdered plastic is placed inside a hollow mold that rotates in an oven. The material melts and coats the mold’s interior, creating hollow products like tanks, toys, and containers.
While all of these techniques have their importance, injection molding remains the most versatile and widespread method due to its ability to produce detailed, high-precision parts in large volumes. The rest of this guide will focus on injection molding machines, their operation, and settings.
Main Parts of an Injection Molding Machine
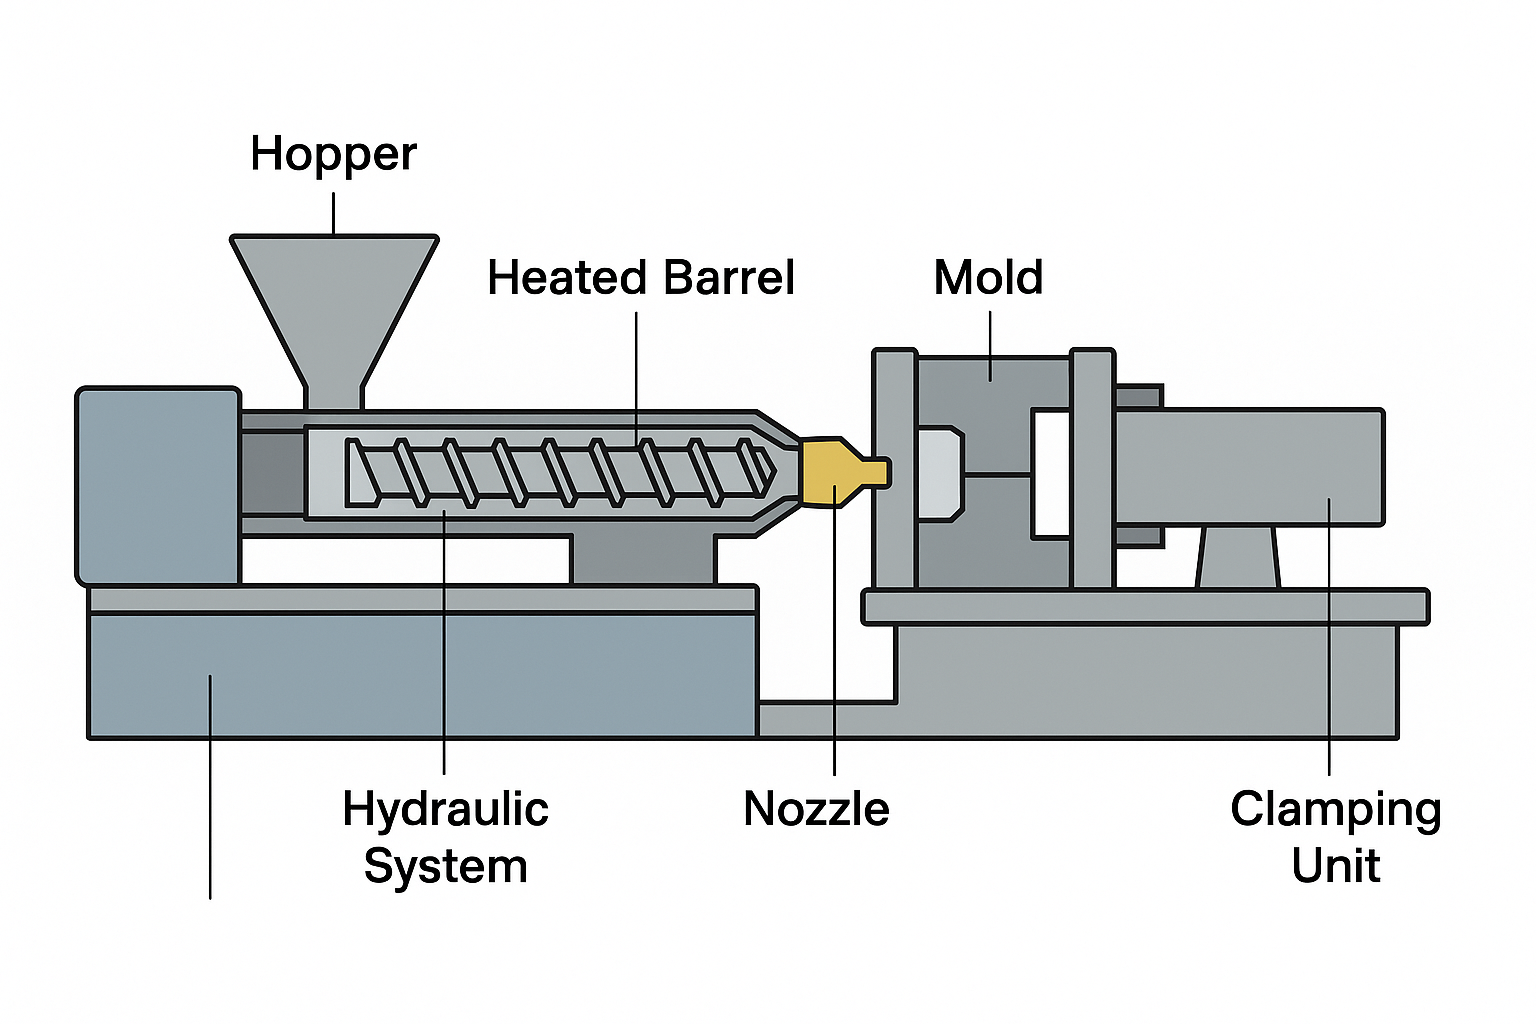
Below is a diagram labeling the essential components:

The machine consists of several critical sections. At the top is the hopper, which stores and delivers raw plastic pellets into the machine. The pellets then move into the heated barrel, where a rotating screw conveys them forward while gradually heating and melting the plastic. This combination of shear and heat ensures thorough melting and homogenization. The melted polymer is then pushed forward through the nozzle, which acts as the connection point between the injection unit and the mold. The mold is where the final part is shaped — molten plastic fills the cavity, cools, and solidifies to match the mold’s geometry. The clamping unit applies strong force to keep the mold halves shut during injection, preventing the material from leaking out. Finally, the hydraulic or electric drive system provides the power for screw rotation, injection, and clamping.
Understanding each part and its role is essential because any malfunction (like poor heating, low clamp force, or worn screws) will directly affect product quality.
Start-Up and Operation Procedure
Operating an injection molding machine involves a series of precise steps. Let’s expand on each:
1. Pre-Start Checks
Before switching on the machine, safety comes first. Operators should always wear heat-resistant gloves, safety glasses, and protective clothing. Next, all utilities such as hydraulic oil, cooling water, and compressed air must be verified. Without proper water flow, molds can overheat and damage. If using moisture-sensitive polymers like nylon or PET, proper drying in a hopper dryer is crucial to prevent degradation and poor part quality.
2. Machine Start-Up
Once utilities are confirmed, power on the machine and turn on heaters. It typically takes 20–30 minutes for the barrel zones and mold to stabilize at their set temperatures. During this period, the screw should be jogged gently after heating to ensure free rotation. Purging the barrel removes any residual material from previous runs, avoiding contamination and defects.
3. Mold Setup
The mold must be mounted securely and aligned in the clamping unit. Cooling lines are connected to regulate temperature, and electrical heaters or sensors are wired if needed. A mold safety check ensures the ejectors, guide pins, and parting line are working properly.
4. Setting Process Parameters
Operators set the barrel temperature profile, injection speed, pressure, holding time, and clamp force. Each setting must be chosen carefully to match the material’s processing window and the part’s requirements. Incorrect parameters can result in short shots, flashing, or part warpage.
Typical Settings for Different Polymers:
- Polypropylene (PP): Barrel 180–230 °C, Mold 30–60 °C, Injection Pressure 800–1200 bar, Injection Speed medium-high, Cooling 15–25 s.
- ABS: Barrel 200–250 °C, Mold 40–80 °C, Injection Pressure 1000–1500 bar, Injection Speed medium, Cooling 20–30 s.
- Polycarbonate (PC): Barrel 260–320 °C, Mold 80–120 °C, Injection Pressure 1200–1800 bar, Injection Speed medium-low, Cooling 25–40 s.
- Nylon (PA6): Barrel 230–280 °C, Mold 60–90 °C, Injection Pressure 1000–1500 bar, Injection Speed medium, Cooling 20–35 s.
- PET: Barrel 250–280 °C, Mold 90–120 °C, Injection Pressure 1200–1600 bar, Injection Speed high, Cooling 15–25 s (must be dried thoroughly).
5. Trial Shots
During initial runs, the mold is closed slowly in setup mode. Injection is done manually at lower speeds to prevent damage. Parts are inspected for quality defects such as weld lines, bubbles, or incomplete filling. Adjustments are made gradually.
6. Production Mode
Once stable, the machine is switched to automatic cycle mode. The process repeats: clamping, injecting, packing, cooling, opening, and ejection. Continuous monitoring is necessary to detect process drifts.
7. Shutdown
To shut down, stop feeding material, purge the barrel, and turn off heaters. Hydraulic pressure should be relieved, and the mold should be left open. The area must be cleaned, and records logged for future reference.
Temperature Profile Example
The temperature profile along the barrel is one of the most important settings. The rear zone must be lower to avoid premature softening or bridging of pellets, while the middle and front zones gradually increase to ensure full melting. The nozzle is often slightly cooler to prevent drooling of molten material.
Here’s a typical ABS temperature profile:

In this graph, we see the temperature gradually rising from the rear zone (200 °C) to the front zone (240 °C), then slightly decreasing at the nozzle (230 °C). This balance ensures smooth melting and avoids overheating or material degradation.
Injection Pressure Profile
Injection pressure is another critical variable. Too little pressure results in incomplete filling, while too much can cause flash, mold damage, or material stress. A controlled pressure profile helps balance flow and quality.

In this graph, the cycle is divided into four stages:
- Filling: Rapid rise in pressure pushes molten plastic into the mold cavity.
- Packing: High pressure is maintained to fill shrinkage and ensure complete part formation.
- Holding: Pressure gradually decreases to maintain the shape while preventing overpacking.
- Cooling: Pressure drops to zero as the part solidifies.
This staged approach prevents common defects like short shots, sink marks, or flashing.
Injection Speed
Injection speed controls how fast the molten plastic fills the mold cavity. High speeds are needed for thin-walled parts to avoid premature solidification, while lower speeds are preferred for thick parts to reduce stress and prevent flow marks.
- Thin parts → high speed (200–500 mm/s) ensures rapid filling.
- Thick parts → lower speed avoids voids and jetting.
- Amorphous plastics like ABS, PS, and PMMA generally tolerate higher speeds.
- Semi-crystalline plastics like PP, PA, and POM often require slower speeds to avoid defects.
Modern machines allow multi-stage speed control: starting fast to fill most of the cavity, then slowing down near the end to prevent defects at the gate or weld lines.
Typical Speed Guidelines for Common Polymers:
- PP: Medium-high speed, 80–150 mm/s.
- ABS: Medium speed, 60–120 mm/s.
- PC: Medium-low speed, 40–100 mm/s (to avoid stress).
- PA (Nylon): Medium speed, 70–120 mm/s.
- PET: High speed, 120–200 mm/s (thin-wall applications).
Machine Settings Checklist
The settings of an injection molding machine are interconnected. Here’s how each plays a role:
- Temperature: Determines melting and flowability of the resin.
- Injection Unit: Speed, injection pressure, holding pressure/time, screw speed, and back pressure all influence melt preparation and delivery.
- Clamping Unit: Clamp force prevents mold opening under cavity pressure, while ejector stroke and speed define how parts are removed.
- Cycle Timing: Each phase (injection, holding, cooling, mold open/close) is carefully timed to ensure repeatability.
- Safety Systems: Interlocks, decompression (suck-back), and alarms prevent accidents and material wastage.
Each parameter must be set based on material datasheets, mold design, and past process knowledge.
Mold Removal (Ejection) Types
Ejection of parts from the mold can be achieved in several ways:
- Ejector pins are the most common, pushing the part out with small round pins. They may leave minor marks.
- Sleeve ejection is used for cylindrical parts, like bottle caps, providing uniform removal force.
- Stripper plates push out thin or flat parts uniformly without pin marks.
- Air ejection blows compressed air between part and cavity to break suction.
- Unscrewing mechanisms are used for threaded parts, rotating the core to avoid damage.
- Robotic/manual removal handles delicate or complex shapes that require special care.
Each method is chosen depending on the geometry and precision requirements of the part.
⚠️ Disclaimer
All information provided in this blog is for educational purposes only. It is not intended for practical machine operation at home or without professional supervision. Injection molding machines operate at very high temperatures and pressures, making them dangerous if mishandled. We do not take responsibility for any consequences of using this data to run equipment.